1998 - Dormer Removal ProjectThis project was to remove the old dormer that led to the 1930-second floor bedrooms. Removal of the stairs on the lower hallway project left these rooms inaccessible except through the temporary door constructed several years before. | |
|
(Left) This is the dormer and door that leads to the 1930 house upstairs bedrooms. The door was a temporary access. |
(Right) - This is the side of the dormer showing the old red steel siding as well as the gray clapboard siding under it. |
|
|
(Left and below) - Removal of roof and end wall in progress. The flexible foil pipe is a temporary sewer vent extension. |
|
|
The removal of the old second floor stairs left the two existing bedrooms cut-off from the house with the exception of a temporary door. The lighting fixtures were disconnected when the lower stair walls were removed. This made access dark and awkward. The project began with the removal of the center wall in the old stairwell followed by the removal of the old dormer roof shingles, sheathing, and rafters. The end wall was removed allowing new framing to begin. I plan a steel insulated door between the 1930's space and the new bedroom space created with the gambrel roof addition. Plans call for reducing the heat in the new bedroom space during times when it is not used. Since the 1930's space opens out on the library and stairwell we want to make sure cold drafts don't become a problem. Following removal of the old roof section and the end wall it is time to figure out how to put it back together. While constructing the Gambrel Roof section I was forced to cut part of the dormer away to make room for the valley where the two roof sections met. This left an odd slanted wall detail that was not very attractive. I have labeled this slanted portion in one of the photos below. We decided to frame a small closet around this detail, eliminating what would have been an eye sore. | |
|
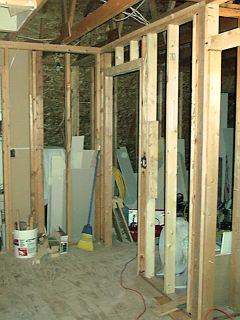
(Left) - Shows door between new bedroom space and 1930's upstairs |
(Right) - Odd slanted wall detail which was the result of the gambrel roof valley. |
|
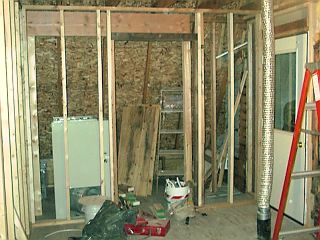
(Bottom Rows) - Closet floor and wall framing. The black wire hanging from the old ceiling is the wire leading to the ceiling fixture in the background. I will use this as a "pull wire" to install new wiring in the existing box without crawling through the attic. (I hope) | |
|
|
| |
My progress was slowed slightly with the installation of carpet on the main floor hallway project. I was able to close up the second floor hallway space by finishing the sheet rock on the hallway side and installing the door. We decided to abandon the surface fixture shown in earlier photos and I installed a 6" recessed can. We will use an "eyeball" trim to point the light down since the fixture is mounted in the slanted ceiling section. Framing is nearly complete for the large hallway section. This common area is about 10' wide by 24' long. There is a furnace closet tucked under the eaves of the gambrel roof on the North side of the house and a large walk-in storage closet on the South side. Access to this common area is by stairs from the Library and Bar area. There will be a door separating the lower level to prevent cold drafts. | |
|
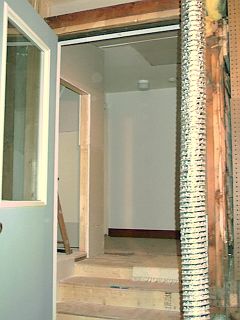
(Left) - Insulated steel door installed in old dormer area |
(Right) - View inside hall showing small closet on left. |
|
|
(Left and Bottom) - From left to right is the framing for the common area hallway. |
|
Furnace shown in what will be a closet with steel insulated fire door. |
This project is not complete but We got all the sheet rock hung on the ceiling and walls and consulted with the furnace guy. Our plan to put the furnace in the closet will work and we plan to have this part sub-contracted out sometime this summer. | |