
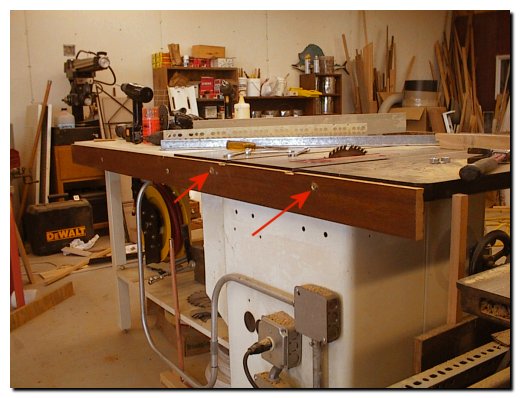
It was nearly noon before I got started on working on my shop projects. I removed all the Christmas lights from the spruce trees in the yard before heading to the shop. Then I did some housekeeping chores to make room to work around the tablesaw. My goal this weekend is to build the cabinet that will extend to the west of the tablesaw. I had built a cabinet like this in the old shop but it was pretty crude and wasted a lot of floor space. The first step was to turn the copper airline pipe 90 degrees to the north. I had originally planned to run the pipe under the cabinet and have an airline on the west side of the cabinet. But then I thought about this copper line with sweat fittings being unaccessable to repairs and decided to turn the pipe and connect it to a spring loaded hose reele (marked with an arrow). The blue arrow in the lower right hand corner shows the direction of the pipe originally. The other red arrow points to the 90 degree fitting that I added to turn the pipe up for easier access from under the table saw extension bench.
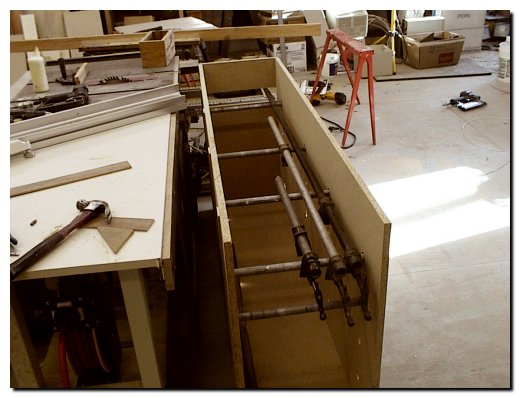
This cabinet is the most complicated cabinet in the shop. It must be exactly the right height for material to slide from the tablesaw onto it without catching on the seam. I worked for over an hour trying to get a support for the counter top attached to the tablesaw. I used 3/8" fine thread bolts to attach the board you see to the tablesaw. There were a couple of tapped holes in the cast iron top and I used carriage bolts through pre-drilled holes on the tablesaw extension bench. Then I built the very strange looking cabinet you see below. As I mentioned above, the cabinet I built in the old shop wasted a lot of valuable floor space as it doesn't make a lot of sense to build a four foot deep cabinet. This 16 inch wide cabinet will be fastened to the floor about 6 inches away front the saw making room for the conduit and cords. The cabinet itself has 4 rows of 1" holes drilled in the sides to accept 3/4" conduit that will support the pipe clamps that need a home. I slipped a few in place for this picture since once the top is in place I won't be able to get a picture of this detail.
My original thought was to build a wall rack for the clamps but then realized that the wall space is far too valuable to take it up with a 3" deep rack and then not be able to place anything in front of it. I will use the bottom shelf for my long levels. The final project was to prime the inside and tablesaw side of the cabinet. I will put a couple finish coats on it tomorrow before screwing it in place.